Search This Blog

Showing posts with label re-enactment. Show all posts

Saturday, 31 March 2012

Embroidered Jorvik Hood

Apologies for once again being rubbish with blog updates!! I have been so busy with sewing in the last couple of weeks I've had no time for blogging!

I've been working really hard on piecing together all the bits for a Viking outfit. I'm going to an event at the start of May and fancied wearing something different, so Viking it is!!

I spent a while researching suitable head wear for the outfit, and decided on a Jorvik hood. As I love all types of historical embroidery, of course my hood had to be covered in some pretty embroidery.
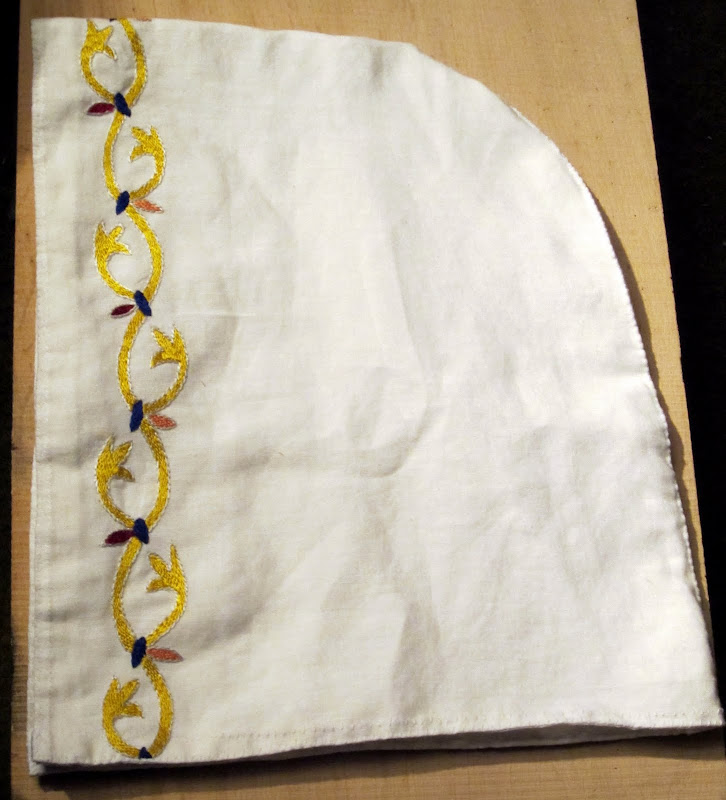

In total there is 24 inches of embroidery around the front of the hood, which is made from linen. I have used the 'acanthus vine' pattern for the embroidery. This pattern was originally found on clothing in burial mound at Bjerringhøj, in Mammen parish, Middelsom, in northern Denmark and is dated to the 10th Century. The find was one of the largest collections found of Viking embroidery. For more information on the pattern and other extant examples of Viking embroidery check out this site -


I drew the pattern onto the linen, and started the embroidery by stitching the whole outline. I tried to stick as closely as possible to the colours in the original find. The pattern is worked totally in silk embroidery thread. The outline has been worked in stem stitch and has been filled in with a variation of long and short stitch, and stem stitch. Once the white outline was finished the pattern seemed to fill in really quickly.


The hood has also been lined with linen, and the two pieces of linen were hand stitched together.


And here's a shot of the hood on. (Apologies for aspects of the photo not being historically accurate.) Very much looking forward to wearing it at an event now :)

Vicki x

Monday, 18 July 2011

Roses, Roses, Roses!

About a week and a half before a Tudor event I did in June I was asked if I would be able to make 8 Tudor Roses for use on a Yeoman of the Guard Tudor Livery jacket. There were 4 jackets, and a rose was required to adorn the front and the back of the livery. It was decided the make the roses out of wool, and applique all the sections onto a piece of linen. I think the most time consuming section was actually cutting out all of the pieces needed - 8 linen squares, 8 red roses, 8 white roses, 40 green leaves and 8 gold centres!! I spent most of that day surrounded by an ever growing pile of material.


After all the cutting out I set to work pinning down all the pieces so that I could get sewing! All the sections are stithced down using two strands of thread.


The centre of the leaves are embroidered with some silk thread from the Silk Mill, and extra detail has been added to the petals of the white rose. In the centre of the flower gold thread has been couched down. Here's a pic of the finished rose.


And a shot of the finished article on Adam's Livery jacket at the Blickling Hall event.


(The livery jacket was made by Prior Attire and is not my work. You can find Prior Attire here - http://www.priorattire.co.uk/ )

All in all it was a bit of a mental time trying to get these finished in the time I had!! After getting the phone call I had work for several days. I tried to find some suitable fabric in Bath, but the so called fabric shops there are pretty rubbish for decent quality material, and the prices are often ridiculously expensive for the quality you are getting! In the end material was sent out to be from off cuts of the livery. This arrived 5 days before we set off for the event. During this time I was moving house, repairing my costume, and on a mission to make as much blackwork as possible for the event. Pretty much the whole journey in the van to the event was spent sewing them and frantically trying to get them finished in time. 4 were totally finished by the Saturday morning, and the 2 more finished by the Sunday. I then thankfully, had another week and a half to finish the last two. Mental times!! If I'd had more time I would of fancied them up a bit more, but oh wells :)

Vicki x

Sunday, 17 July 2011

Cuffs for Kathryn Howard

Before Christmas last year I was asked to by a close friend to make some cuffs for part of her new Kathryn Howard outfit. We spent quite a lot of time researching patterns for this project, as we were keen to get the period of the blackwork as accurate as possible. After much discussion we decided to combine blackwork used in two different portraits. The first being a portrait of Jane Seymour by Holbein -


From this portrait we used the blackwork band from around the edge of the cuff. I managed to find a better quality close up version of the cuffs, which enabled be to see the pattern in more detail, and re-draw it. After several tries at getting the size if the pattern correct I found one that worked well.

The second portrait is one believed to be of Kathryn Howard herself -


From this portrait we used the thin vertical bands that radiate in towards the wrist. The only versions of this painting I could find were all very low quality so I was unable to exactly copy the pattern used, and therefore decided to base mine on one found in the Janet Arnold: Patterns for Fashion 4 book. I drew the whole thing up on graph paper, and then set to stitching.

It's stitched on linen, with black silk embroidery thread from the Silk Mill. After getting started on the design there was much discussion on how long these cuffs should be. We eventually decided to make them just over double the length of the wrist measurement. I have a feeling they were around 18" long, but the paper this was written has evaporated into the sea of packed boxes whilst moving.

I was working on these on and off for several months, but when I had the time to focus on just them, the cuffs came along quite quickly. Here's some pics of the finished design -


And a close up -


Overall I am really happy with how the combination of the two patterns turned out. After finishing the embroidery I gave the lengths of embroidered material to my friend who was going to make them look more cuff like. The material was pleated into a cuff band and neatened up around the edge. The first time I saw the finished article was at the event at Blickling, and it was great to see them in use as part of such a beautiful costume.


(Gown was made by Prior Attire - http://www.priorattire.co.uk/)
(Rings on show were made by Gemmeus - http://www.gemmeus.com/)

Thanks for reading, Vicki x

A Dabble into Redwork

For a bit of a change I decided to start on a redwork pattern for demonstration at the Blickling Hall event. I have recently been reading a book on Bess of Hardwick, who is an amazing women, with a fascinating story. The front cover of this book is a a fabulous portrait of her wearing a garment totally embroidered in a fabulous redwork design.


Whilst researching her online I found that someone had already drawn this pattern out, and therefore I most definitely had to make it. As I knew I wanted to work on this at the event I started to stitch the pattern onto material on my frame a week or so before. In the end it only took about an hour to stitch the first segment using the pattern.


This pattern proved to be quite popular at the event, and as I'd done lots of reading on Bess of Hardwick was a really good talking point to be able to explain where the pattern had come from and the history behind it. In fact, I spent more time talking to members of the public than actually sewing, and was great to see so many people interested in the craft.

After the event I took the material off the frame. I do find the frame quite difficult to work, and find that it doesnot keep the material anywhere near as tight as I would like. This may be something to do with by bodged up attempt at getting it to stay on the frame though ...

Once into my trusty little hoop I was well away with the pattern, and it was finished within about 3 days. It's all stitched on linen, using one strand of red silk embroidery thread from the Silk Mill. This pattern was great fun to do, and I am hoping to use it on a new Elizabethan coif for myself :D

Here's some pictures -


The Blickling Hall event was great fun. Was amazing to see Henry VIII, all his six wives and a little Prince Edward all in one place at such a fabulous setting. I managed to get one shot of my costume at the event -


Thanks for reading,
Vicki x

Guisborough & New Tudor Kit

*waves*

I was invited to an Elizabethan event by the fantastic Black Knight Historical (http://www.blackknighthistorical.co.uk/) which meant that a whole new Tudor kit was needed. With much help from my ever patient Mum, we made a grey over gown, that was trimmed with fur at the bottom. In hind sight, making said over gown out of very thick wool was a bit of a warm experience shall we say!! My favourite part about making this new kit though, was actually getting to make some blackwork items for myself and getting to wear them :D!!! Before now all the blackwork I had been producing had been as commissions for other people, so I always had to wave goodbye to the pretty embroidery. Until now!! I was working on the embroidery for the best part of 2 weeks:

Coif - 3.5 days
Partlet - 5 days
Shift - 2 days

Overgown - 1 week!!

The coif was a total pain, mainly due to a mistake in the measurements, meaning that initially it was too small for my head. A lot of unpicking later, restarted with the right measurements and all went well. The coif is based on one I found online (I forget where) and just totally fell in love with. Some of the flower patterns in the diamonds are taken from the Warwick Shirt. (http://www.warwickshire.gov.uk/web/corporate/pages.nsf/links/aa47f702d5996adc80257149002da95e) I used a pattern from the Tudor Tailor for the coif. (http://www.tudortailor.com/) The coif also has some pearls sewn into the small diamonds, to make it look that bit posher.


The partlet has all be handsewn. I found the pattern for the collar on the Blackwork Archives. This website really is amazing and has some great patterns on it :) (http://www.blackworkarchives.com/)
The collar was actually pretty easy to do, and the pattern seemed to appear really quickly. For the detailing down the front of the partlet I used the line running through the middle of the flowers to tie it all together. The same pattern is used across the front of the shift, and around the cuffs.


All the blackwork was done using silk from The Silk Mill. I have to say this thread is a joy to work with! (http://www.thesilkmill.com/)

I really enjoyed making the whole kit, as well as having great fun at the event, where I was doing blackwork displays. It was lovely to finally get to wear some of my own embroidery at last :) Here's a shot from the day of the event, in full kit with my embroidery frame working on the second cuff for my next commission!


There are more detailed shots of everything in this blog over in the gallery section of my website - www.embroideryemporium.co.uk :)

Vicki x