Search This Blog

Showing posts with label silk. Show all posts

Saturday, 12 May 2012

April Round Up

Hello!!

I know this April Round Up is coming a bit late but things have been a bit hectic here at Embroidery Emporium HQ!! I've been moving house - yay!! (I now have my own crafting space and fabric/costume wardrobe - that is once I uncover the floor from more boxes!!), been away at events, and been uber busy with some pretty big commissions and making my Viking garb, which has left very little time for updating my blog!

So here's what I've been up to in April, and how I'm progressing with my 50 projects list!

3. Stitch Japanese wedding sampler.
It's done, it's done, it's done! It was an enormous amount of work, but I am so very pleased with how it turned out. You will have to wait several more months till I can post pictures of it though :) But it couldn't have turned out better!

9. Organise all my silk.
I spent many hours doing this recently! I had a commission which was done with many shades of silk thread so had to organise them to make them easier to use. I got bored and created this silk spool tower :p


10. Sort out Viking outfit.
It's done!! Well mostly! it's still awaiting an embroidered band to around the top of the apron dress, but it is now perfectly wearable and it is awesome!! I wore to an event recently and it was so warm and comfortable. I'll do a proper blog update for it but for now here's a shot of me wearing it at Pensthorpe -


34. Actually get enough courage to do my first swap on Craftster, instead of just reading all of the awesome ideas on the swap board and never entering one.
I finally did it, and am currently participating in the UK Only swap over on Craftster. I've made 2 of my items and the third is currently being worked on :) More info to follow once my swap partner has received them :)

As well as all these I also started a Hunger Games cross stitch project which I made the pattern for myself. Currently stitching the third part so that should be done soon. Made a good start on another wedding sampler for a family friend, and finally found a baby sampler I liked to stitch up for my cousins second baby!

What took up most of my time this month (apart from Viking things) was an embroidery commission I receievd via my website to embroider some artwork. This was a great project to do and it will receive it's own blog very soon, but here's a sneak peak of the finished commission -


Hopefully now that moving and everything is out of the way I should have more time to update this blog :) Thanks for reading, Vicki x

Saturday, 31 March 2012

Embroidered Jorvik Hood

Apologies for once again being rubbish with blog updates!! I have been so busy with sewing in the last couple of weeks I've had no time for blogging!

I've been working really hard on piecing together all the bits for a Viking outfit. I'm going to an event at the start of May and fancied wearing something different, so Viking it is!!

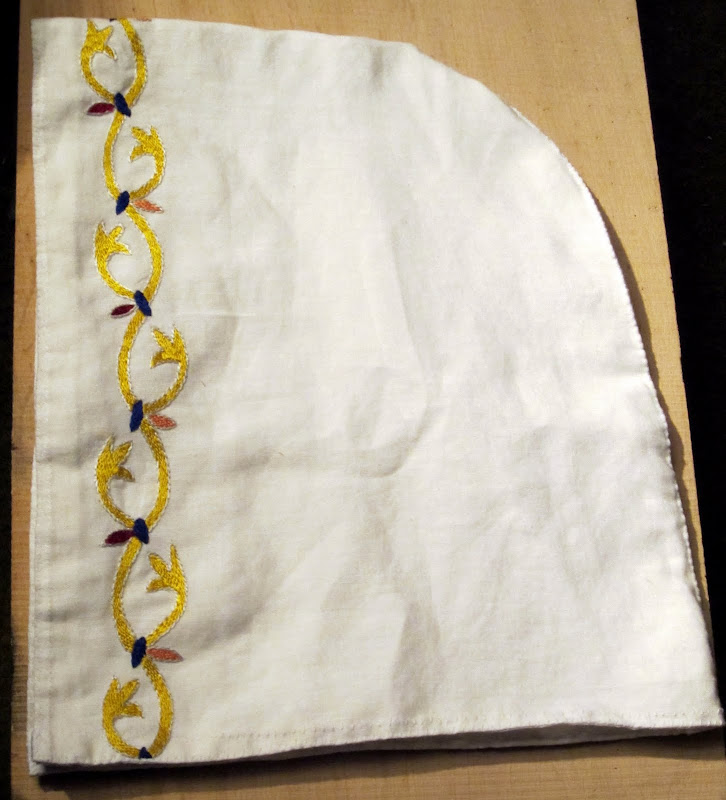
I spent a while researching suitable head wear for the outfit, and decided on a Jorvik hood. As I love all types of historical embroidery, of course my hood had to be covered in some pretty embroidery.


In total there is 24 inches of embroidery around the front of the hood, which is made from linen. I have used the 'acanthus vine' pattern for the embroidery. This pattern was originally found on clothing in burial mound at Bjerringhøj, in Mammen parish, Middelsom, in northern Denmark and is dated to the 10th Century. The find was one of the largest collections found of Viking embroidery. For more information on the pattern and other extant examples of Viking embroidery check out this site -


I drew the pattern onto the linen, and started the embroidery by stitching the whole outline. I tried to stick as closely as possible to the colours in the original find. The pattern is worked totally in silk embroidery thread. The outline has been worked in stem stitch and has been filled in with a variation of long and short stitch, and stem stitch. Once the white outline was finished the pattern seemed to fill in really quickly.


The hood has also been lined with linen, and the two pieces of linen were hand stitched together.


And here's a shot of the hood on. (Apologies for aspects of the photo not being historically accurate.) Very much looking forward to wearing it at an event now :)

Vicki x

Thursday, 15 December 2011

Blackwork Commission

Apologies for being dreadful at updating my blog recently, have been uber busy with stitching! So, back in May I received a blackwork commission for the fabulous couple who run 4 & 20 Blackbirds, who are a group that demonstrate authentic historical cookery, and I have to say there food is absolutely delicious!! Here's a link to their facebook which I recommend that you check out - https://www.facebook.com/pages/4and20-Blackbirds-bringing-historical-cookery-to-life/181236131901644 . I was commissioned to make two sets of blackwork collars and cuffs for them to wear with their posh Tudor outfits. We spent a while deciding on patterns and in the end we settled on this one from the Blackwork Archives - http://blackworkarchives.com/art/lace2.gif. I modified the pattern slightly, left out the crosses and the extra bit on the top of the pattern, as I thought this would make them a bit to wide for their purpose. A work in progress shot -
The thread of this linen was incredibly fine, which made counting it rather difficult and time consuming. In order to get a straight and uniform look with my blackwork, I always count the thread of the linen as I find this gives me the most precise results. It is embroidered with silk thread from the Silk Mill - http://www.thesilkmill.com/default.asp The finished cuffs -
There is over 60 inches of blackwork in total, which worked out as to nearly 120 hours worth of stitching - I think. Sort of lost count after I reached the 100 hours mark!!! The completed set was handed over at the end of October, and I am now very much looking forward to seeing the blackwork in use on their costume :D :D And here is the finished set -
Vicki.

Tuesday, 26 July 2011

Regency Reticule & Other Graduation Gifts

My lovely friend recently graduated from her History degree with a first, which was totally awesome!! In order to say a big congratulations I wanted to make her some gifts :)

I asked her if there was something she wanted for any of her historical costumes, and we decided on a regency reticule. The bag is made from silk and lined with linen, and all the embroidery has also been done using silk thread.


I traced the design lightly onto the silk with pencil, and have used 2 strands of thread for all the stitching. The design was one I found here - http://www.needlenthread.com/


The border is mostly done in backstitch, with some satin stitch for the centre of of the flower.


I then backstitched around the outline for the "K" and filled in the letter with satin stitch.


I bought a blue silk tassel and stitched that into the bottom lining of the bag,and then threaded blue silk ribbon through the top for the wrist straps. It's a big bigger than some reticules I have seen as I wanted it to be big enough for my friend to hide her phone in at events. Damn smart phones and their large screens :P

As well as making the reticule I wanted to make her something that actually celebrated her degree. I started looking at graduation samplers online but found nothing that I really liked, so I decided to combine aspects from several I had seen and came up with this -


I drew out the pattern I wanted on graph paper. It has a graduation cap and certificate with a bow. I stitched a "1st" into the certificate and then stitched up the details of her degree in the University's colours. Popped a border around the outside, which I made up as I went along and then popped it in a frame.

She also needed a card -


This was another pattern which I put together using a few designs. Stitched on the cap and certificate and then tinted them with wax crayon. I foolishly stitched the grey border in before doing the writing!! I wanted to write "congratulations" in the top but got fed up of trying to make the letters fit in, so in the end went for "YAAAY". Much more fun :P Cut a hole of a card and stuck the piece down, with some sticker peel on's to make it a bit more interesting.

And here they are all together -


Thanks for reading, V x